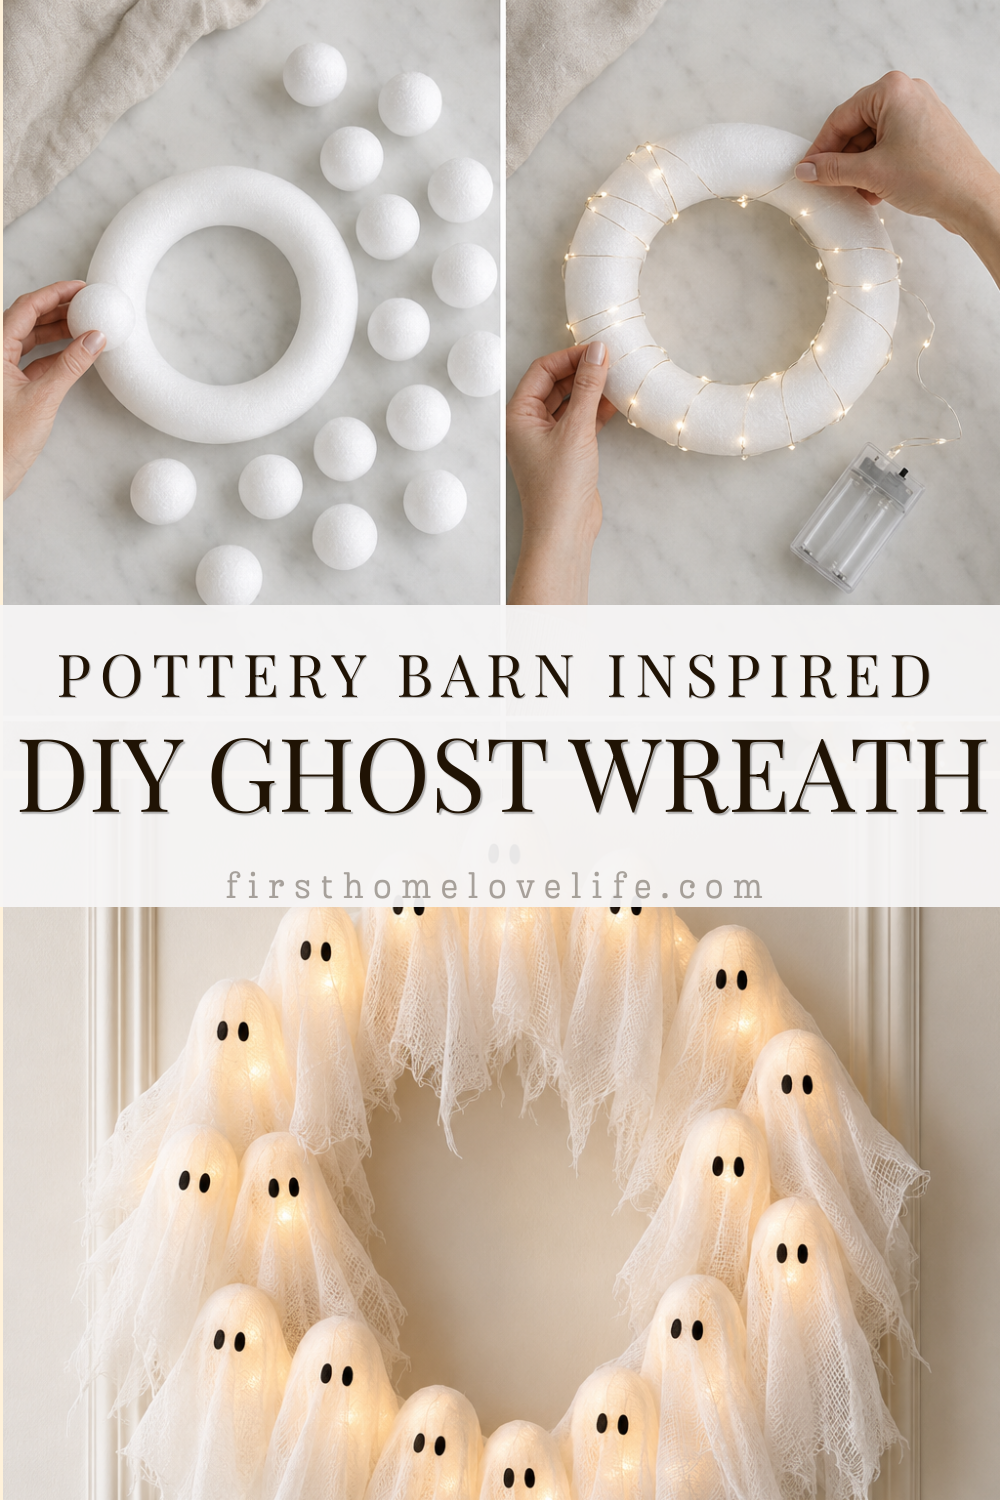
This DIY lighted ghost wreath is the perfect mix of spooky and charming for your Halloween front porch. Inspired by the popular Pottery Barn Lit Ghosts Wreath, this homemade version features a circle of glowing white ghosts made with cheesecloth, foam balls, and warm white fairy lights.
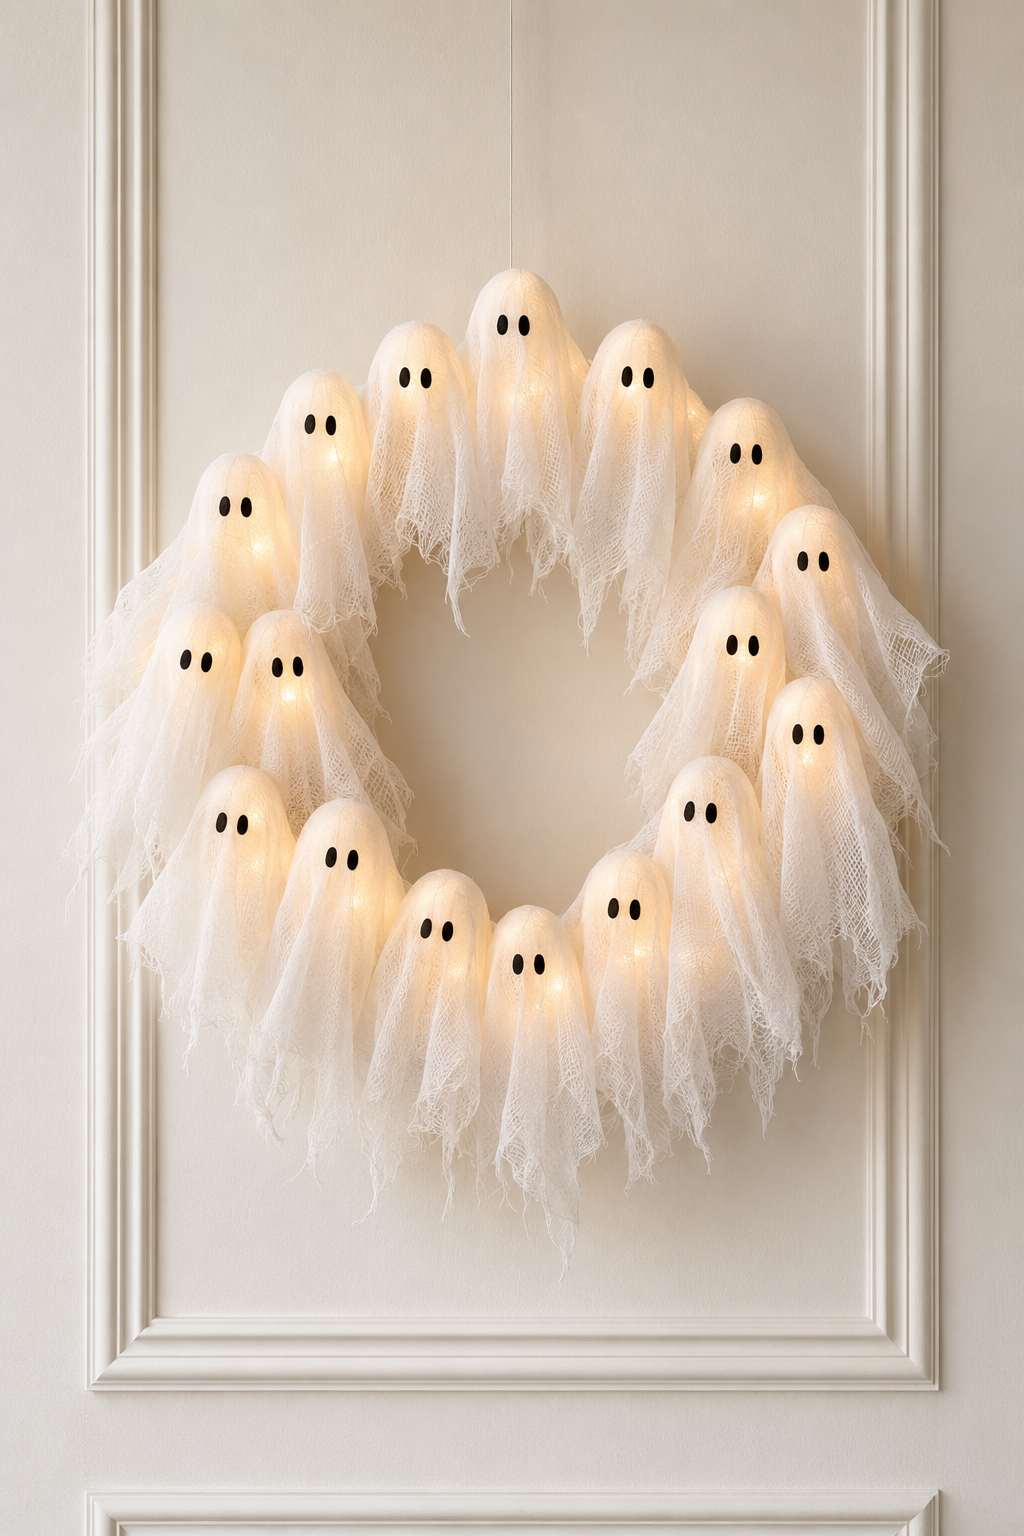
The soft, flowing fabric gives each little ghost its own personality, while the warm lights create an inviting glow after dark. Best of all, you can make this Pottery Barn-inspired Halloween wreath yourself for a fraction of the retail price.
Hang it on your front door, display it above a Halloween mantel, or add it to a covered porch for an easy Halloween decoration that looks just as pretty during the day as it does at night.
Other DIY Halloween Decorations To Make





Why You’ll Love This DIY Ghost Wreath
There is something about friendly little ghosts that makes Halloween decorating feel fun without being overly scary. This handmade wreath is especially cute because no two ghosts will look exactly alike.
You’ll also love that this project is:
- Easy to customize
- Lightweight and simple to hang
- Less expensive than the store-bought version
- Beautiful when illuminated at night
- Perfect for indoor or covered outdoor decorating
- Easy to store and reuse each Halloween

Supplies You’ll Need
Most of the materials for this DIY Halloween ghost wreath can be found at a craft store, dollar store, or online.
- One 16- to 18-inch foam wreath form
- 12 to 14 foam balls, approximately 2½ to 3 inches wide
- White cheesecloth or gauze fabric
- One strand of battery-operated warm white fairy lights
- Black felt or black craft foam
- Low-temperature hot glue gun
- Hot glue sticks
- Straight pins or floral pins
- Scissors
- White floral wire
- Clear fishing line or sturdy ribbon for hanging
- Fabric stiffener or liquid starch, optional
- Small paintbrush, optional
Choosing the Right Wreath Form
A lightweight foam wreath form is the easiest option for this project. It gives you a solid surface for attaching the ghosts while keeping the finished wreath light enough to hang from a door or window.
A wire wreath frame can also work, but you may need additional floral wire to keep the ghosts securely in place.
How to Make a DIY Lighted Ghost Wreath

Step 1: Plan the Placement of the Ghosts
Place the foam wreath form flat on your work surface. Arrange the foam balls around the wreath before attaching anything.
Use approximately 12 to 14 foam balls, depending on the size of your wreath. Position some of the balls slightly higher and others slightly lower so the ghosts do not look too evenly spaced or perfect.
This variation will make your homemade Halloween wreath look more natural and give each ghost its own personality.
Step 2: Add the Fairy Lights
Wrap the battery-operated fairy lights around the wreath form, spacing the bulbs around the outside and front of the wreath.
Try to position one light near the top of each foam ball. The lights should sit underneath the cheesecloth so the ghosts appear to glow from within.
Secure the light strand to the wreath with floral pins, small pieces of white floral wire, or dots of low-temperature hot glue. Place the battery pack at the bottom or back of the wreath where it will be easy to reach.
Do not permanently glue the battery compartment closed. You will need access to the switch and batteries.
Step 3: Attach the Foam Balls
Attach each foam ball to the wreath form using floral pins or short pieces of floral wire.
If necessary, add a small amount of low-temperature hot glue for extra support. Avoid using a high-temperature glue gun because it can melt the foam.
Make sure each ball is firmly attached before adding the fabric.
Step 4: Cut the Cheesecloth
Cut the cheesecloth into squares approximately 14 to 18 inches wide. The exact size will depend on how long and full you want the ghosts to appear.
You do not need to make every piece identical. Different lengths and slightly uneven edges create the tattered, flowing appearance that makes this wreath so charming.
For a fuller ghost, layer two pieces of cheesecloth together.
Step 5: Create the Ghost Shapes
Drape one or two pieces of cheesecloth over each foam ball. Position the fabric so it falls down and around the wreath form.
Use straight pins or a small amount of low-temperature hot glue to secure the cheesecloth near the back or underside of each foam ball. Gently pull and arrange the fabric to create a rounded head and flowing body.
Allow some of the cheesecloth to overlap neighboring ghosts. This helps cover the wreath form and gives the finished decoration a fuller appearance.
Step 6: Shape the Fabric
Pull, wrinkle, and separate the edges of the cheesecloth until the ghosts have a soft, wispy appearance.
For more defined shapes, lightly brush the fabric with diluted fabric stiffener or liquid starch. Shape the cheesecloth with your fingers and allow it to dry completely.
Do not saturate the fabric. It should remain soft and airy rather than becoming hard or stiff.
Step 7: Make the Ghost Eyes
Cut small oval eyes from black felt or black craft foam. Each ghost needs two eyes.
Make the eyes slightly different sizes and shapes to give the ghosts a handmade appearance. Attach them to the front of the cheesecloth using small dots of low-temperature hot glue.
Place the eyes slightly below the center of each foam ball. This creates the simple, sweet ghost faces seen on the inspiration wreath.
Step 8: Finish the Back of the Wreath
Turn the wreath over carefully and trim or secure any loose wires. Make sure the fairy-light cord and battery pack are firmly attached.
Add a loop of fishing line, floral wire, or sturdy ribbon to the back of the wreath for hanging. Clear fishing line works especially well because it creates the illusion that the wreath is floating.
Step 9: Fluff and Adjust the Ghosts
Hang the wreath and step back to check the overall shape. Rearrange the cheesecloth, separate any ghosts that appear crowded, and make sure the wreath form is completely covered.
Turn on the fairy lights and adjust the fabric so the warm glow shines through each ghost.
More Halloween Ideas You’ll Love
How to Make the Ghost Wreath Look More Expensive
The key to creating a high-end Halloween wreath is keeping the design simple and using plenty of flowing fabric.
Layering the cheesecloth helps disguise the foam wreath form and gives the ghosts a softer, fuller appearance. Warm white lights also create a more classic look than bright white or multicolored lights.
Avoid arranging the ghosts in a perfectly even pattern. Slightly different heights, fabric lengths, and eye shapes will make the wreath look handmade without looking overly crafty.
Can You Hang This Ghost Wreath Outside?
This DIY ghost wreath is best displayed indoors or on a covered porch where it will be protected from rain and strong wind.
If you plan to hang it outside, use battery-operated lights labeled for outdoor use. You should also protect the battery compartment from moisture and bring the wreath inside during heavy rain or storms.
Cheesecloth can absorb water and lose its shape, so avoid hanging the wreath in an uncovered location.
Easy Ways to Customize Your Halloween Wreath
Although the classic white and black combination is timeless, you can easily customize this lighted ghost wreath.
Add Different Expressions
Give a few ghosts tiny round mouths made from black felt. You can also tilt the eyes in different directions to make each ghost look unique.
Use Vintage-Style Fabric
Tea-stain the cheesecloth for a slightly aged or antique Halloween look. Allow it to dry completely before assembling the wreath.
Add More Lights
Use two short strands of fairy lights if you want the ghosts to glow more brightly. Keep both battery packs accessible at the back of the wreath.
Add a Black Ribbon
Tie a black velvet or grosgrain ribbon at the bottom for a more polished finish. Choose a narrow ribbon so it does not distract from the ghosts.
Make a Smaller Version
Use a 12-inch wreath form and smaller foam balls to create a lightweight ghost wreath for an interior door, kitchen cabinet, or Halloween gallery wall.
How to Store a Handmade Ghost Wreath
Store the wreath in a large wreath box or shallow plastic storage container. Avoid placing heavy decorations on top of it because the foam balls and cheesecloth can become crushed.
Remove the batteries from the light pack before storing the wreath. This prevents corrosion and helps the lights last longer.
Gently fluff and reshape the fabric when you bring the wreath out again the following Halloween.
Frequently Asked Questions
What can I use instead of cheesecloth?
White gauze, muslin, tulle, or lightweight cotton fabric can also be used. Cheesecloth works especially well because its loose weave allows the fairy lights to shine through.
Can I make this wreath without lights?
Yes. The ghost wreath will still look cute during the day without lights. However, the warm glow is what gives the finished project its most eye-catching Halloween effect.
How many ghosts should I add to the wreath?
A 16- to 18-inch wreath usually needs approximately 12 to 14 ghosts. You can add more for a fuller design or use fewer ghosts for a simpler look.
What type of glue is safe for foam?
Use a low-temperature hot glue gun or a glue specifically labeled as foam-safe. High-temperature glue can melt or damage foam wreath forms and foam balls.
How long does this Halloween wreath take to make?
The wreath can usually be completed in one to two hours. Allow additional drying time if you use fabric stiffener or liquid starch.
Final Thoughts
This DIY lighted ghost wreath is an easy way to bring a little playful Halloween magic to your front door. The glowing ghosts look impressive, but the wreath is surprisingly simple to make with basic craft supplies.
By using inexpensive foam balls, cheesecloth, and battery-operated fairy lights, you can recreate the look of a high-end Pottery Barn-inspired ghost wreath without paying the designer price.
Display it on a covered porch, above the fireplace, or in a front window and enjoy its warm, spooky glow throughout the Halloween season.