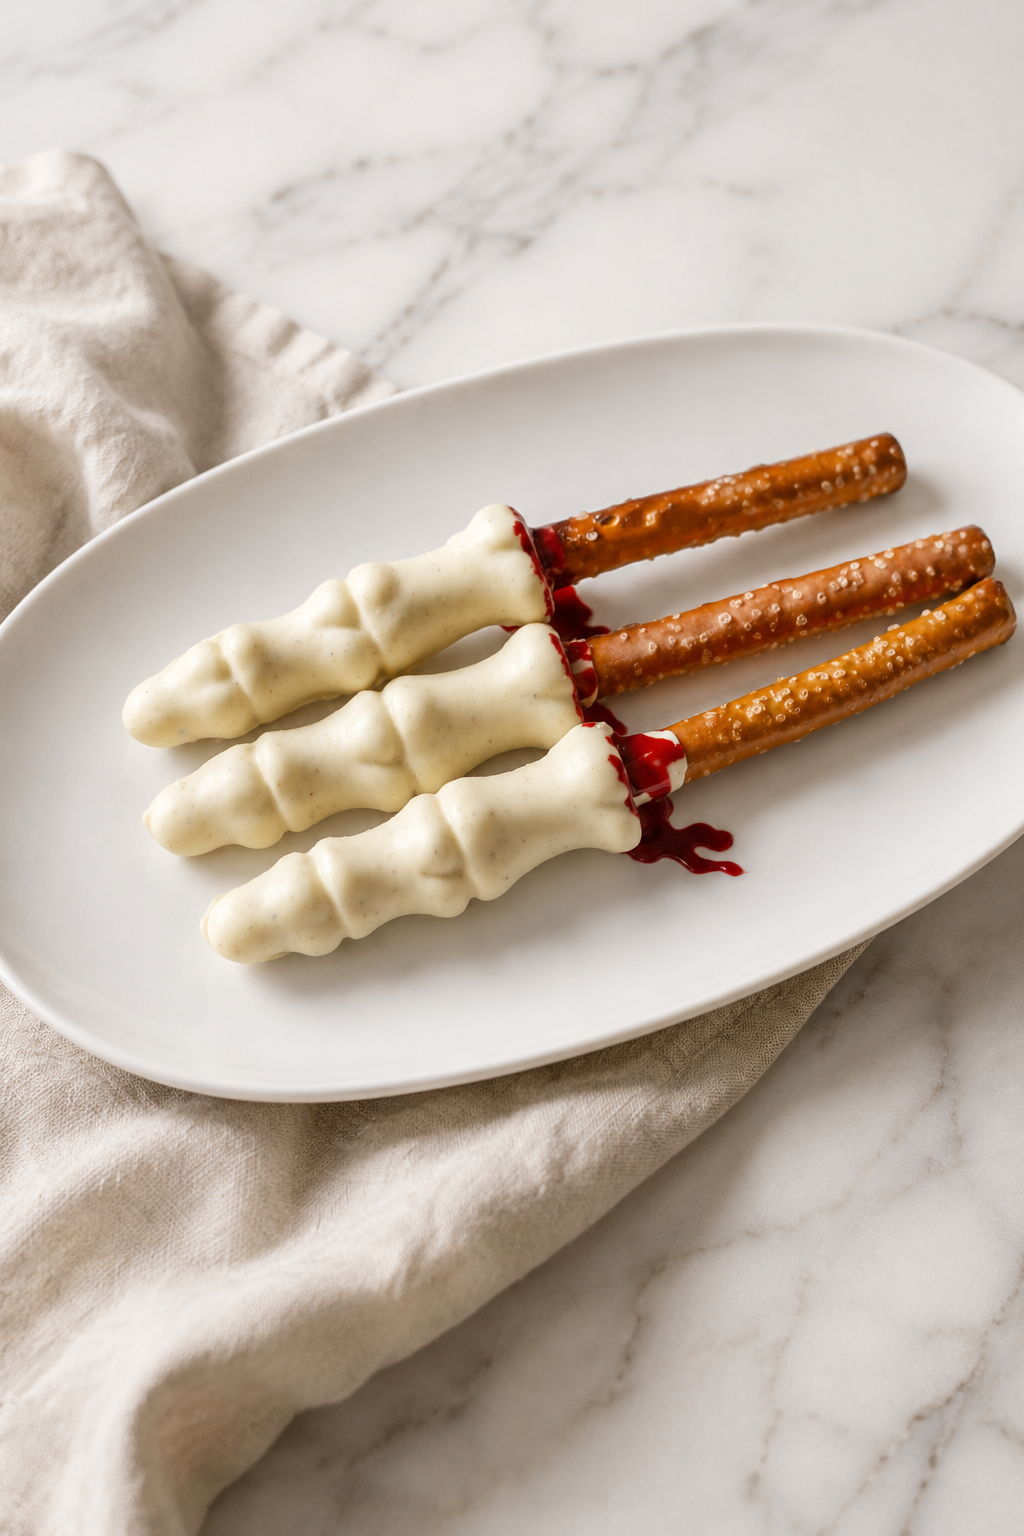
These chocolate skeleton fingers are creepy, crunchy, and surprisingly easy to make with white chocolate, pretzel rods, and a skeleton finger candy mold. They are the perfect no-bake Halloween treat for parties, classroom celebrations, dessert boards, or a spooky family movie night.
The white chocolate creates the look of old bones, while the pretzel rods hidden inside add a salty crunch and make each finger easier to hold. Add a few drops of red candy coating around the broken ends for an extra-creepy finishing touch.
If you are planning a Halloween party, serve these skeleton fingers alongside my Easy Halloween Popcorn, Halloween Cake Eyeballs, and Marshmallow Eyeballs for a dessert table everyone will remember.
More Halloween Treats to Make

Why You’ll Love These Chocolate Skeleton Fingers
- Only a few simple ingredients
- No baking required
- Easy to prepare ahead of time
- Sweet, salty, and crunchy
- Perfect for Halloween parties
- Fun for children to help make
- Easy to customize with different chocolate colors
- Impressive without requiring complicated decorating
What Are Chocolate Skeleton Fingers?
Chocolate skeleton fingers are molded Halloween candies made with melted white chocolate and crunchy pretzel rods.
A skeleton finger candy mold gives the chocolate realistic knuckles, joints, and bone details. The pretzel rod runs through the center, helping reinforce the chocolate while adding a salty crunch.
They look elaborate, but most of the work is done by the mold. Once the chocolate is melted, you simply fill the mold, add the pretzels, and allow the fingers to harden.
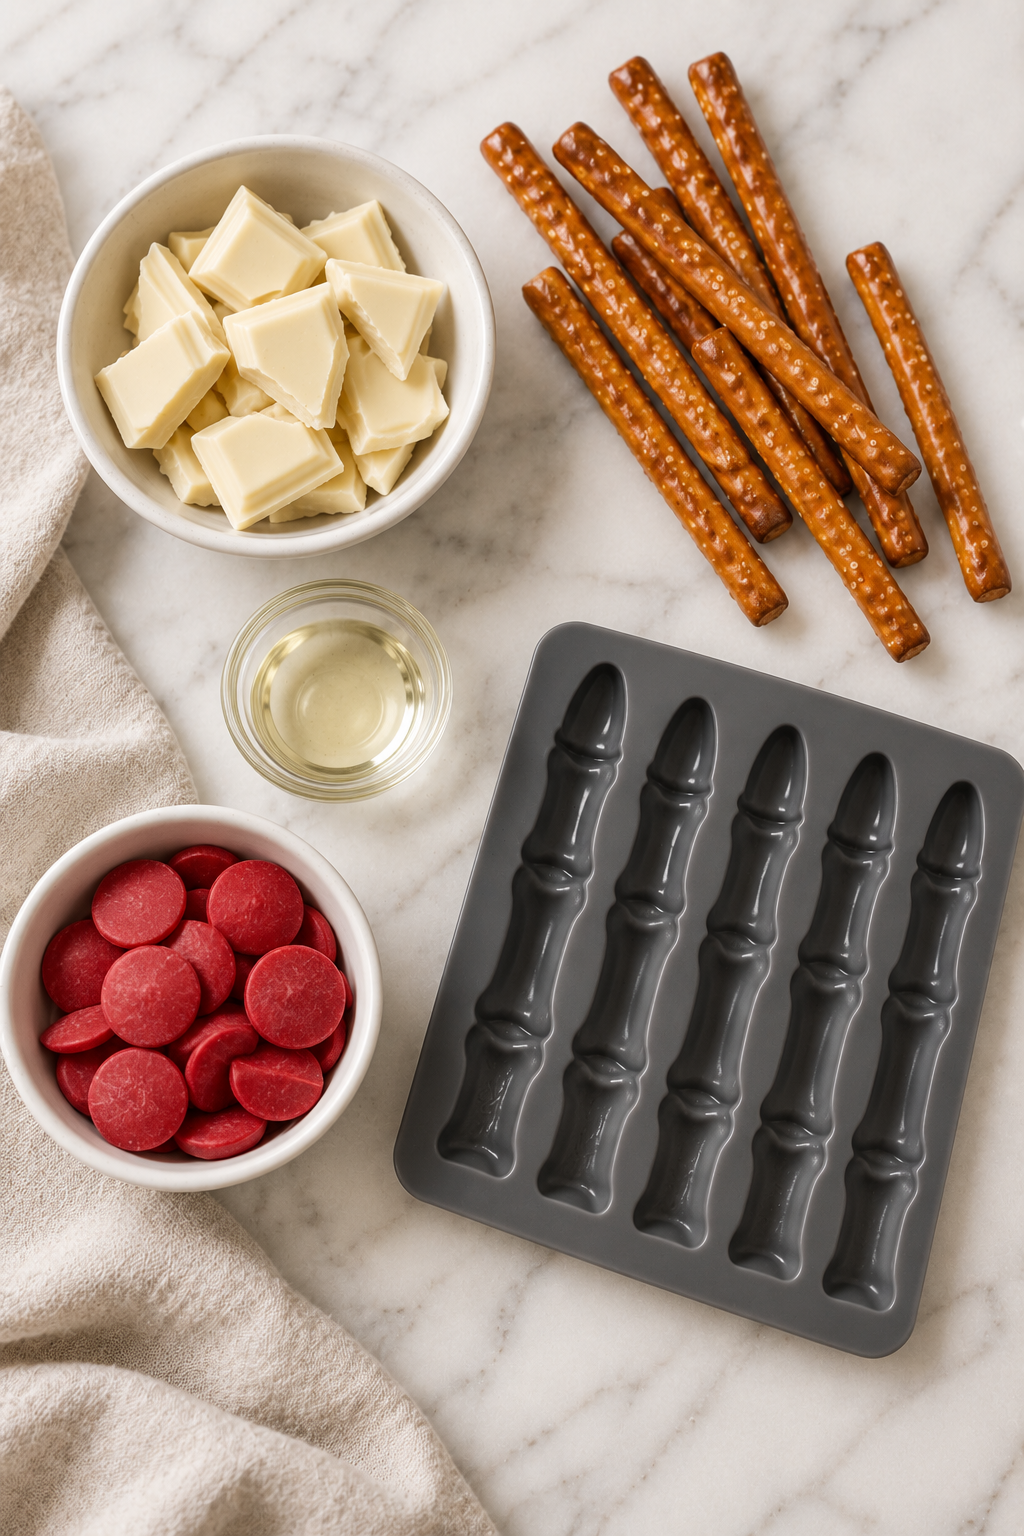
The simple ingredients and candy mold needed to make white chocolate skeleton fingers for Halloween.
Ingredients You’ll Need
White Chocolate
White chocolate gives the fingers a realistic bone color. You can use white chocolate baking bars, white chocolate melting wafers, vanilla almond bark, or white candy melts.
Melting wafers and candy coating are generally the easiest options because they melt smoothly and set firmly.
Pretzel Rods
Pretzel rods create a crunchy center and make the finished fingers easier to lift from a serving platter.
Cut or break the rods as needed so they fit inside your candy mold without extending too far beyond the chocolate.
Vegetable Oil
A small amount of vegetable oil can help loosen melted white chocolate if it is too thick to spread into the detailed mold.
Skip the oil when using candy melts unless the package recommends adding it. Candy coating that becomes too thin may not set properly.
Red Candy Melts or Decorating Gel
This is optional, but a little red candy coating around the broken end makes the fingers look much creepier.
Use melted red candy wafers for a firm finish or red decorating gel if the treats will be served shortly after decorating.
Equipment Needed
- Skeleton finger candy mold
- Microwave-safe measuring cup or bowl
- Spoon or small silicone spatula
- Parchment or wax paper
- Microwave
- Small food-safe paintbrush, optional
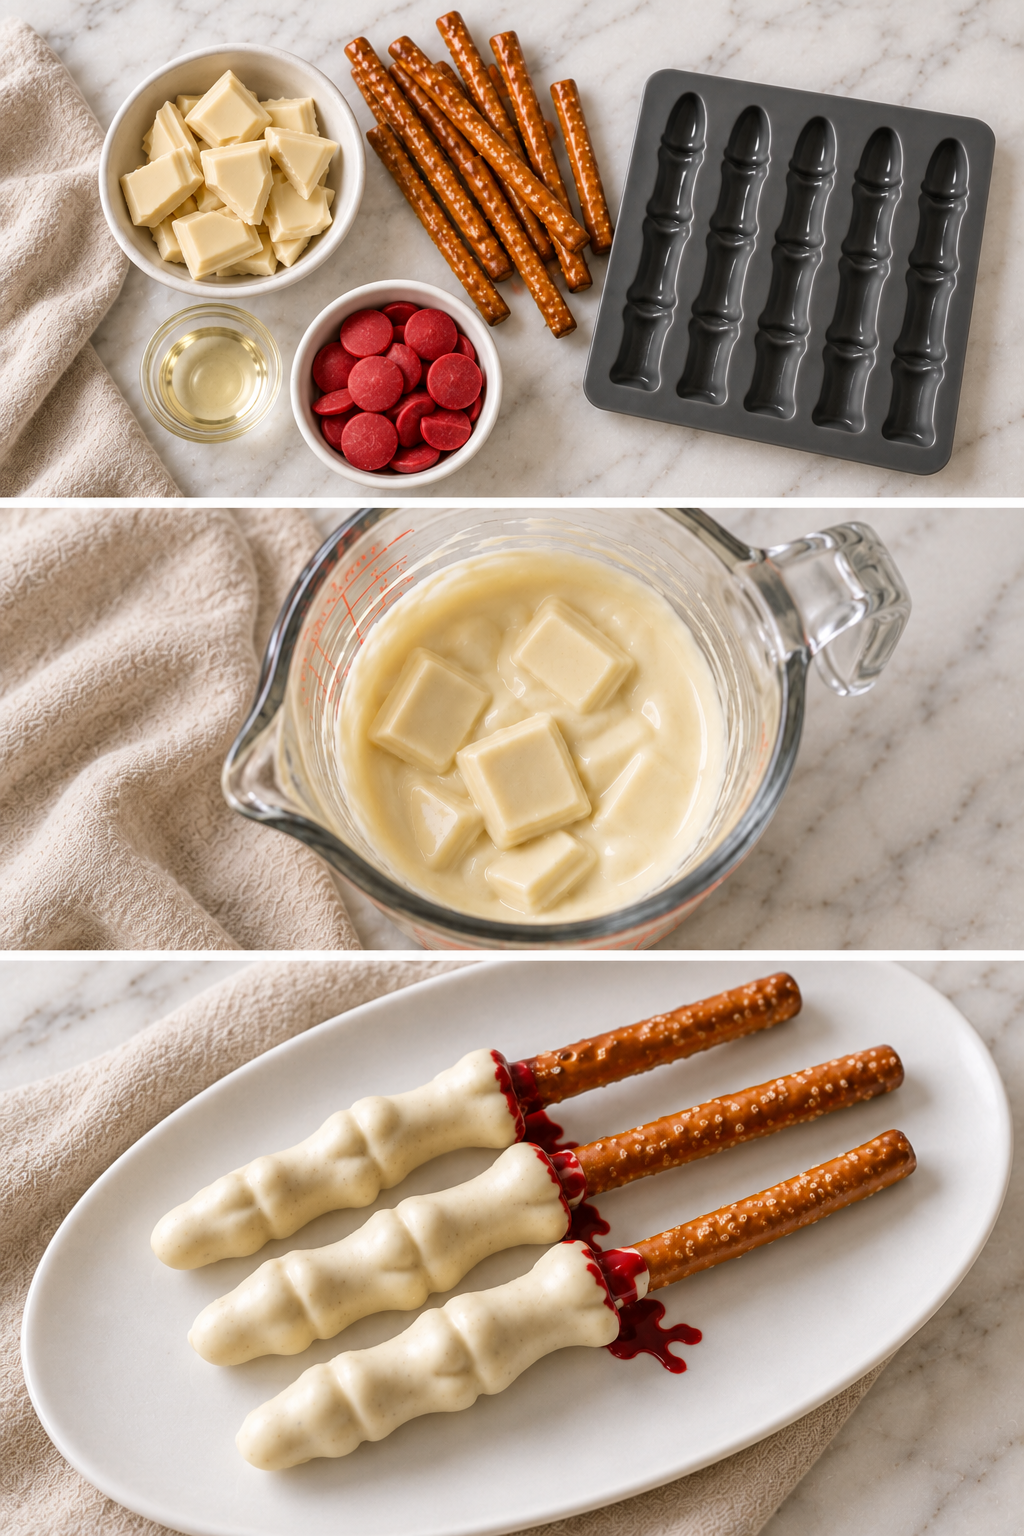
How to Make Chocolate Skeleton Fingers
1. Prepare the Mold
Make sure the skeleton finger mold is completely clean and dry.
Even a small amount of water can cause melted chocolate to seize and become grainy. Place the mold on a flat baking sheet or cutting board so it will be easy to transfer to the refrigerator.
2. Prepare the Pretzel Rods
Place the pretzel rods over the mold to determine the correct length.
Break or cut them so they fit inside each finger cavity. The pretzels should stop just short of the fingertip and can extend slightly from the broken end.
3. Melt the White Chocolate
Break the white chocolate into small, evenly sized pieces and place them in a microwave-safe bowl.
Microwave for 30 seconds and stir thoroughly. Continue heating in 15-second intervals, stirring after each interval, until the chocolate is smooth.
White chocolate can burn quickly, so avoid overheating it.
If the melted chocolate is too thick, stir in approximately one teaspoon of vegetable oil. Add only enough to make it easier to spread into the mold.
4. Fill the Detailed Areas
Spoon a small amount of white chocolate into each finger cavity.
Use the tip of a spoon or a small food-safe brush to work the chocolate into the knuckles, joints, and other detailed areas. Gently tap the mold against the counter to release trapped air bubbles.
5. Add the Pretzel Rods
Place one prepared pretzel rod into each cavity.
Press it gently into the chocolate without pushing it all the way to the bottom of the mold. The pretzel should remain surrounded by chocolate so it does not show through the finished finger.
6. Cover With More Chocolate
Spoon additional melted white chocolate over each pretzel until the cavity is completely filled.
Smooth the top with a spoon or small spatula. This will become the back of the skeleton finger, so it does not have to be perfectly neat.
Tap the mold against the counter once more to settle the chocolate and eliminate air pockets.
7. Chill Until Firm
Transfer the mold to the refrigerator for approximately 20 to 30 minutes, or until the chocolate is completely firm.
You can place the mold in the freezer for about 10 minutes if you need the fingers to set faster. Avoid leaving them in the freezer for an extended period because condensation may form after they are removed.
8. Remove the Fingers From the Mold
Gently flex the mold to loosen the chocolate.
Carefully push each skeleton finger out onto a sheet of parchment or wax paper. Do not pull on the exposed pretzel because it could separate from the chocolate.
9. Add the Bloody Details
For a creepier presentation, drizzle or brush a small amount of melted red candy coating around the broken end of each finger.
Let the red coating harden completely before serving or storing.
Tips for Perfect Molded Chocolate Fingers
- Make sure the mold is completely dry before adding chocolate.
- Melt the white chocolate slowly to prevent scorching.
- Stir after every heating interval, even if the chocolate does not appear melted.
- Tap the filled mold against the counter to remove air bubbles.
- Work chocolate into the smallest details before adding the pretzel.
- Do not overfill the cavities.
- Allow the fingers to harden completely before unmolding.
- Handle the chocolate with clean, dry hands.
- Avoid storing the fingers in a warm or humid area.
What If My White Chocolate Is Too Thick?
White chocolate is naturally thicker than milk or dark chocolate and can sometimes be difficult to spread into detailed candy molds.
If you are using real white chocolate, stir in a small amount of vegetable oil or coconut oil. Begin with ½ teaspoon, mix well, and only add more if necessary.
If you are using candy melts, use a candy-thinning product or a very small amount of refined coconut oil. Too much added oil can prevent the coating from setting properly.
How to Prevent Air Bubbles
Small air bubbles can keep the chocolate from filling the knuckles and other intricate details in your mold.
To prevent them:
- Add a thin layer of chocolate first.
- Work it into the details with a small brush or toothpick.
- Tap the mold firmly against the counter.
- Add the pretzel only after the detailed areas are covered.
- Tap the mold again after filling it completely.
If a small section breaks while unmolding, use a dab of melted chocolate as edible glue.
Make Them Look Old and Weathered
Bright white chocolate can look a little too clean for skeleton bones. To give the fingers an aged appearance, lightly brush cocoa powder into the recessed details after the chocolate has set.
Use a clean, dry food-safe brush and apply a very small amount around the knuckles and joints. This creates natural-looking shadows without changing the flavor significantly.
You can also blend white and ivory candy melts for a warmer bone color.
Make It Your Own
These skeleton fingers can be customized to match almost any Halloween theme.
Try one of these variations:
- Use milk or dark chocolate for zombie fingers.
- Tint white candy melts pale green for monster bones.
- Add crushed chocolate cookies for a dirt-covered effect.
- Brush edible luster dust over the details.
- Add red candy melts around the broken ends.
- Dip the ends in crushed cookies or sprinkles.
- Arrange the fingers around a bowl of chocolate pudding “dirt.”
- Serve them in a clean cauldron or vintage-style platter.
- Place them on a Halloween dessert board with cookies and candy.
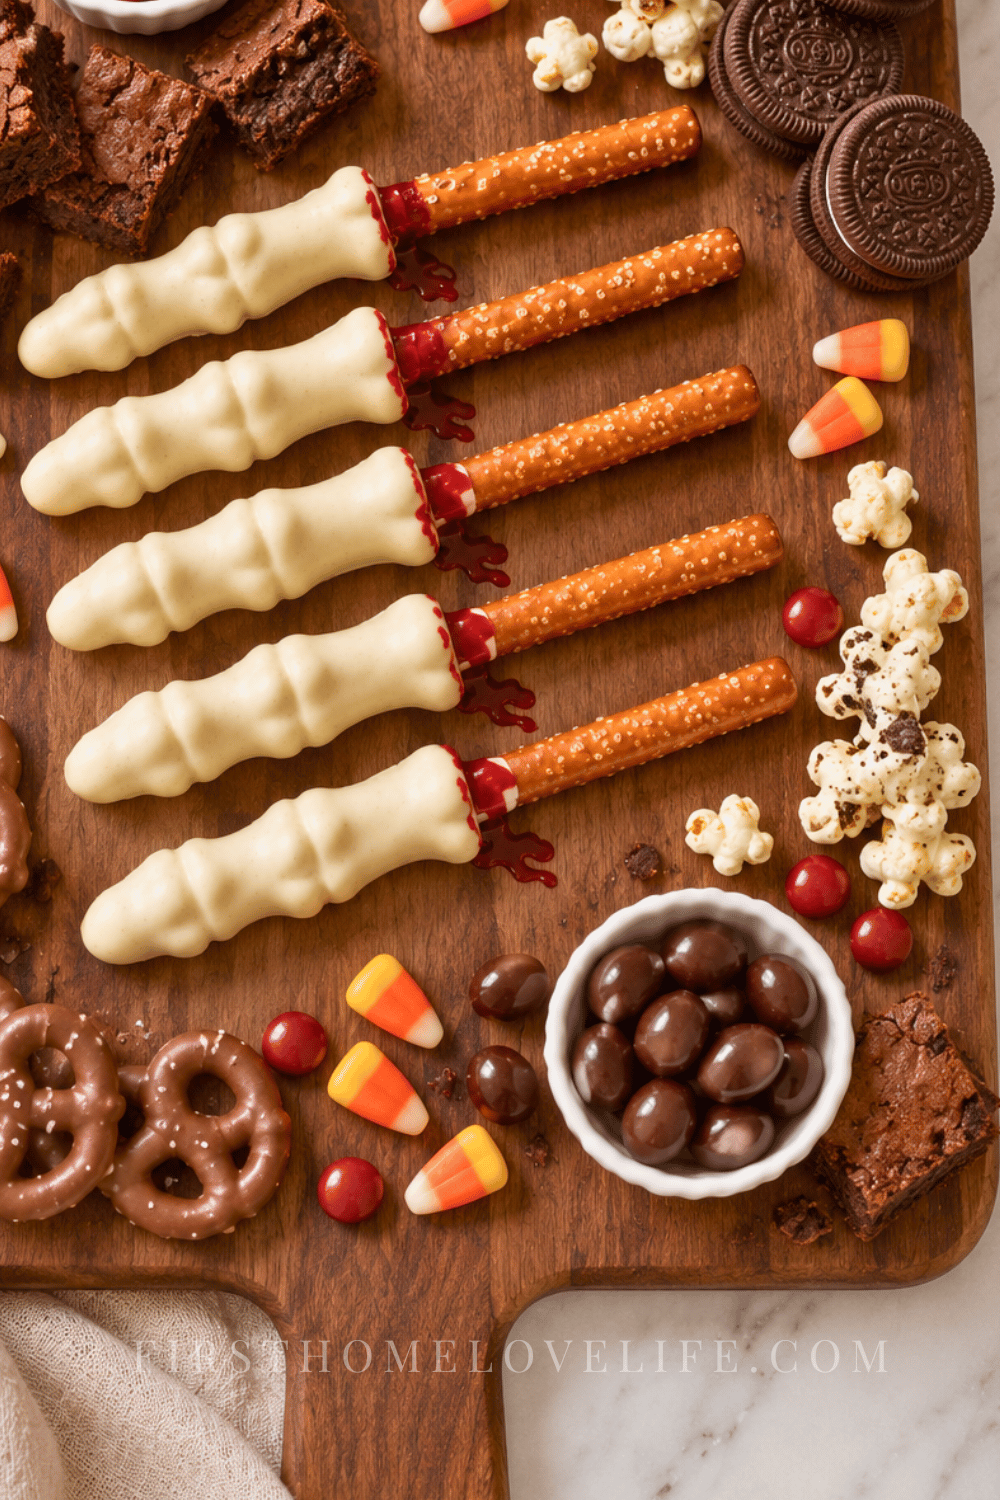
How to Serve Chocolate Skeleton Fingers
Arrange the fingers on a dark platter, wooden serving board, or parchment-lined tray.
For an easy Halloween dessert board, pair them with:
- Halloween popcorn
- Chocolate sandwich cookies
- Gummy worms
- Candy eyeballs
- Marshmallows
- Chocolate-covered pretzels
- Candy corn
- Brownie bites
- Fresh strawberries
- Halloween sprinkles
You can also stand the fingers upright in a bowl filled with crushed chocolate cookies to make them look like they are reaching out of the ground.
Can You Make Skeleton Fingers Ahead of Time?
Yes. Chocolate skeleton fingers are a great make-ahead Halloween treat because they do not need to be served warm or refrigerated.
Prepare them up to one week before your party and keep them in an airtight container in a cool, dry place.
If you use decorating gel instead of hardened candy coating for the bloody details, add it shortly before serving so it does not become sticky or smear during storage.
How to Store Chocolate Skeleton Fingers
Place the finished fingers in a single layer inside an airtight container. If you need to stack them, separate the layers with parchment or wax paper.
Store them at cool room temperature for up to one week.
Avoid storing the chocolate in direct sunlight, near a stove, or anywhere it may become warm. Refrigeration is usually unnecessary and may cause condensation to form on the chocolate.
Frequently Asked Questions
Can I make chocolate skeleton fingers without pretzels?
Yes. Fill the candy mold entirely with melted chocolate and allow it to set normally. The fingers will be sweeter and slightly more fragile without the pretzel centers.
Can I use white chocolate chips?
White chocolate chips can work, but they are formulated to hold their shape and may not melt as smoothly as baking bars or melting wafers. Add a very small amount of vegetable oil if necessary.
Where can I find a skeleton finger mold?
Look for Halloween candy molds at craft stores, baking-supply stores, party stores, or online. Silicone and flexible plastic molds both work.
Can I use a silicone mold?
Yes. Silicone molds are flexible and make it easy to release the finished fingers. Place the mold on a flat baking sheet before filling it so it can be moved without bending.
Why did my chocolate become grainy?
Chocolate can become grainy when it is overheated or comes into contact with water. Always use a completely dry bowl and heat the chocolate in short intervals.
Can children help make these?
Children can help arrange the pretzels, fill the molds, and decorate the hardened fingers. An adult should supervise melting and handling the warm chocolate.
Are chocolate skeleton fingers gluten-free?
Not when made with traditional pretzel rods. To make them gluten-free, use certified gluten-free pretzel sticks or omit the pretzel centers. Always check every ingredient label when preparing food for someone with an allergy.
More Easy Halloween Treats
Complete your Halloween party menu with these easy ideas:
- Easy Halloween Popcorn with Candy and White Chocolate
- Halloween Cake Eyeballs
- Marshmallow Eyeballs
- Spooky Turkey Meatball Sandwiches
Final Thoughts
These easy chocolate skeleton fingers are the perfect combination of creepy and delicious. White chocolate gives them a realistic bone-like appearance, while the pretzel centers add a satisfying salty crunch.
They are simple enough to make with children but impressive enough to become the centerpiece of a Halloween dessert table. Prepare them ahead of time, add a few bloody red details, and serve them at your next Halloween party, movie night, or spooky-season celebration.