If you’re looking for a fun, colorful dessert that instantly screams summer, these snow cone cupcakes are it. Inspired by classic snow cones you’d grab on a hot day, these cupcakes are light, fluffy, and topped with vibrant swirls of flavored frosting that look just like shaved ice.
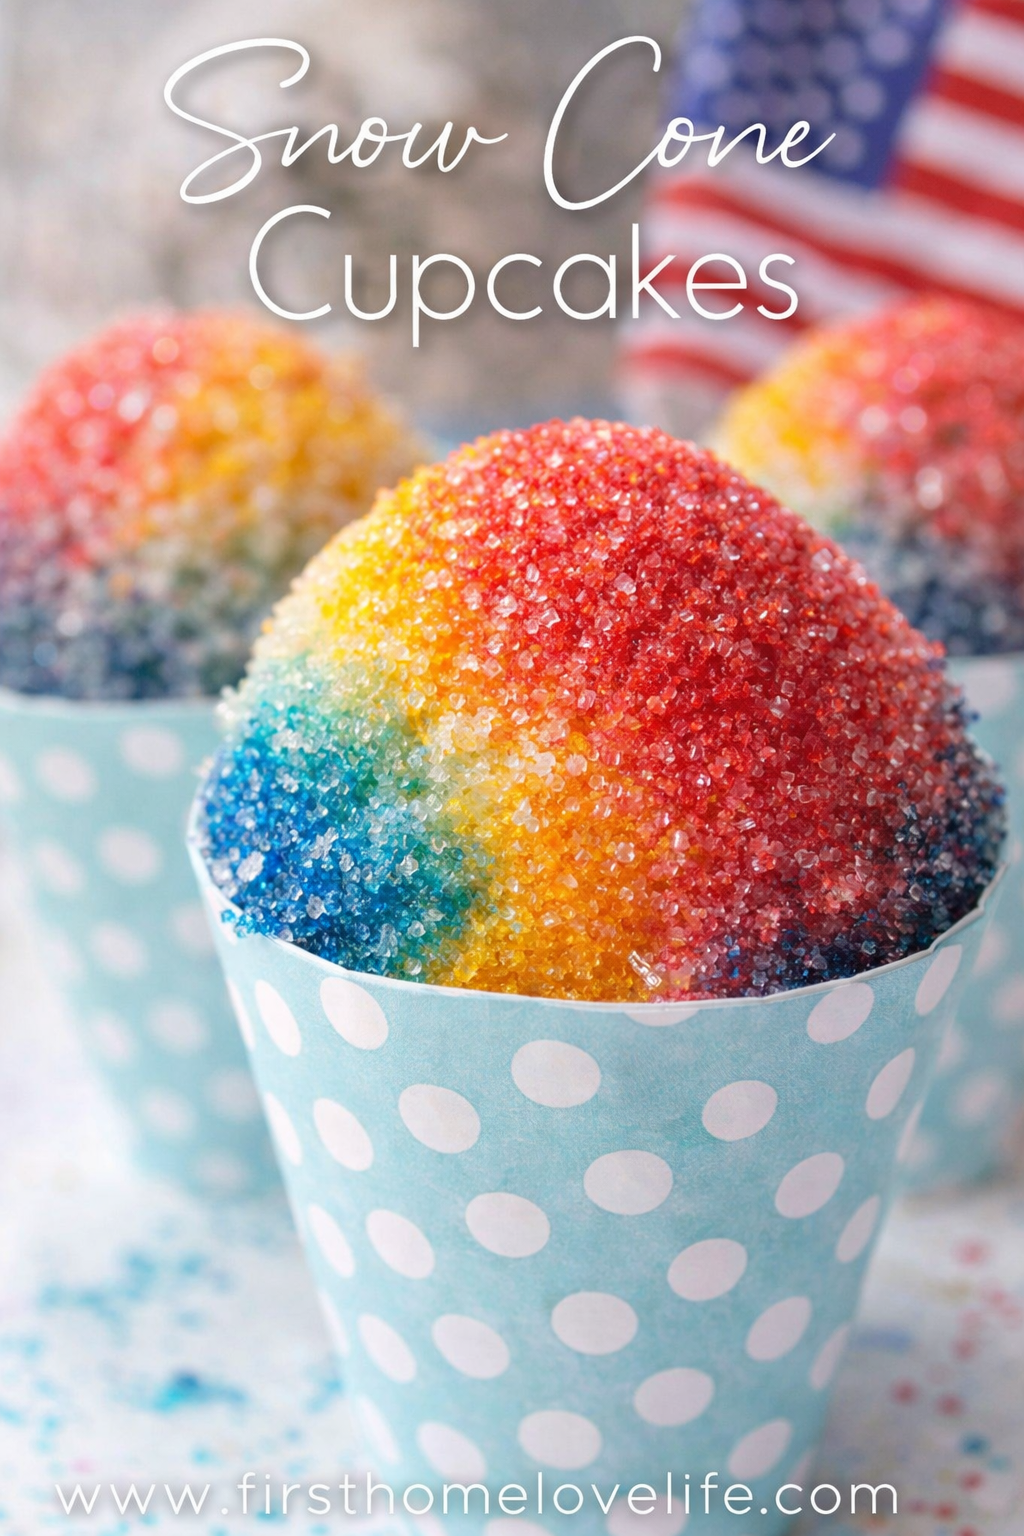
They’re perfect for summer birthdays, backyard BBQs, pool parties, and 4th of July celebrations. Best of all, they’re easy to make using a simple cupcake base and a few bright frosting colors — no fancy decorating skills required.
Why You’ll Love These Snow Cone Cupcakes
- Bright, cheerful colors that look amazing on dessert tables
- Easy to customize with your favorite snow cone flavors
- Kid-friendly and perfect for summer parties
- Can be made ahead of time
- A fun twist on classic summer cupcakes
These cupcakes are always a hit, especially with kids — but adults love them just as much!
Ingredients You’ll Need
For the Cupcakes
- 1 box white or vanilla cake mix
- Ingredients listed on the box (eggs, oil, water)
For the Frosting
- 2–3 cups vanilla buttercream frosting (homemade or store-bought)
- Red, blue, and yellow gel food coloring
- Optional: snow cone syrup or flavor extracts
Optional Toppings
- White sanding sugar or coconut flakes
- Clear cupcake liners for a true snow cone cup look
How to Make Snow Cone Cupcakes
Step 1: Bake the Cupcakes
Prepare the cake batter according to package directions. Line a muffin tin with cupcake liners and fill each about ⅔ full. Bake as directed, then cool completely before frosting.
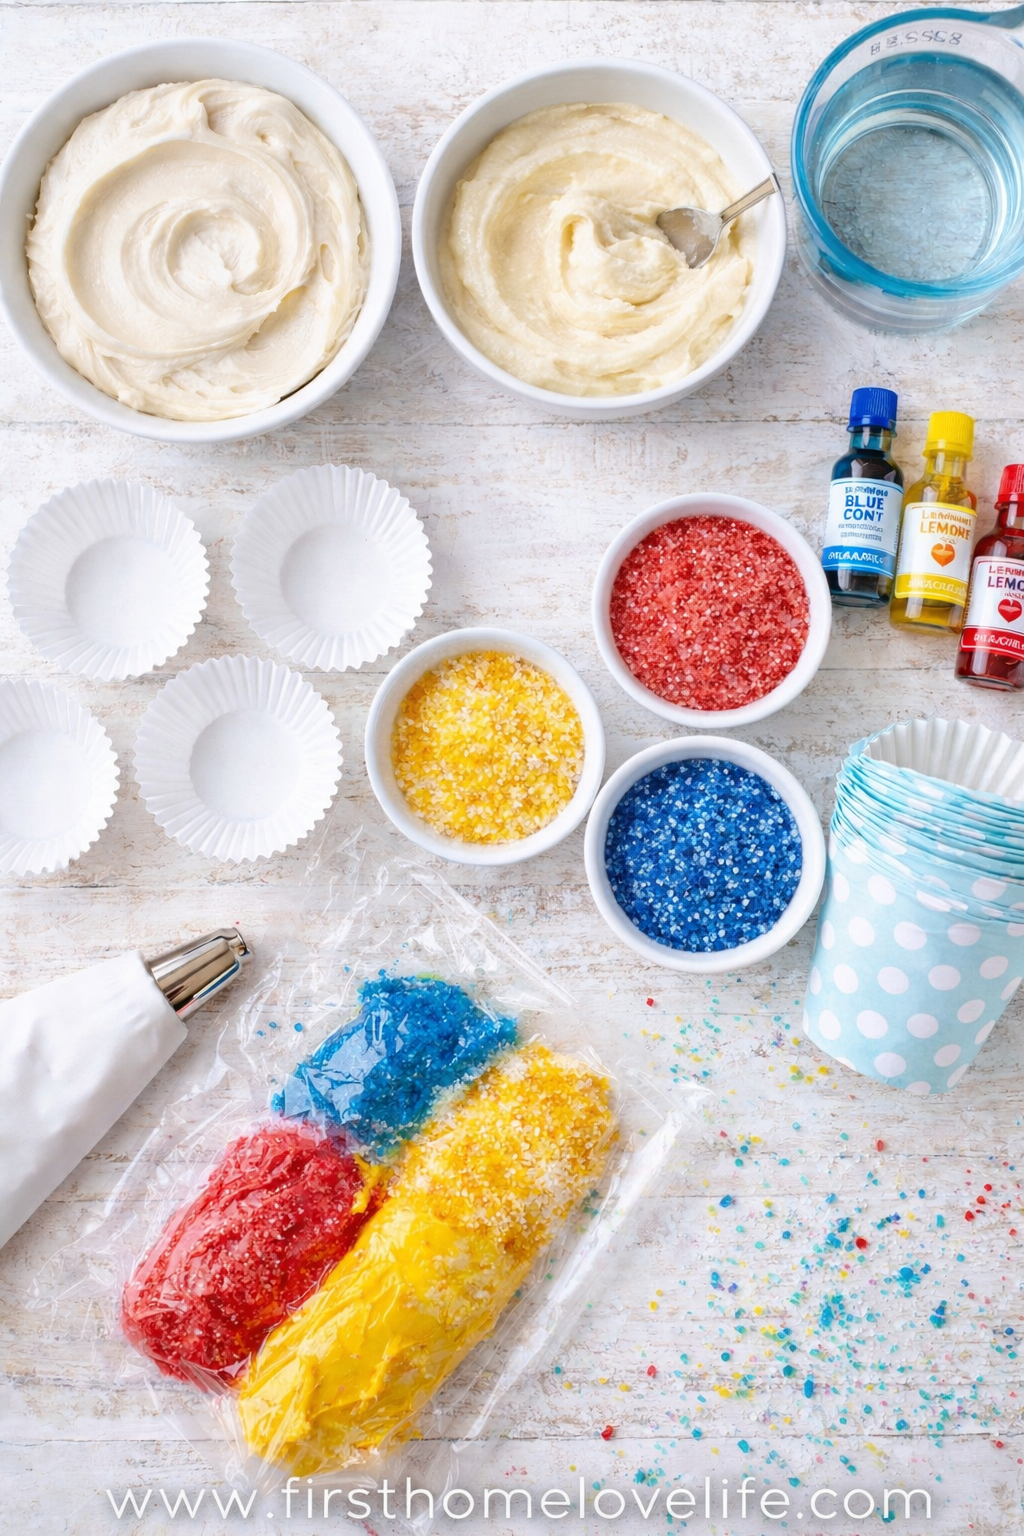
Step 2: Color the Frosting
Divide the buttercream into three bowls. Tint one red, one blue, and one yellow using gel food coloring. If desired, add a small amount of snow cone syrup to each bowl for extra flavor.
Step 3: Fill the Piping Bag
Lay out a sheet of plastic wrap. Spoon each frosting color in straight lines side-by-side. Roll tightly into a log, twist the ends, and place inside a piping bag fitted with a round or open star tip.
Step 4: Frost the Cupcakes
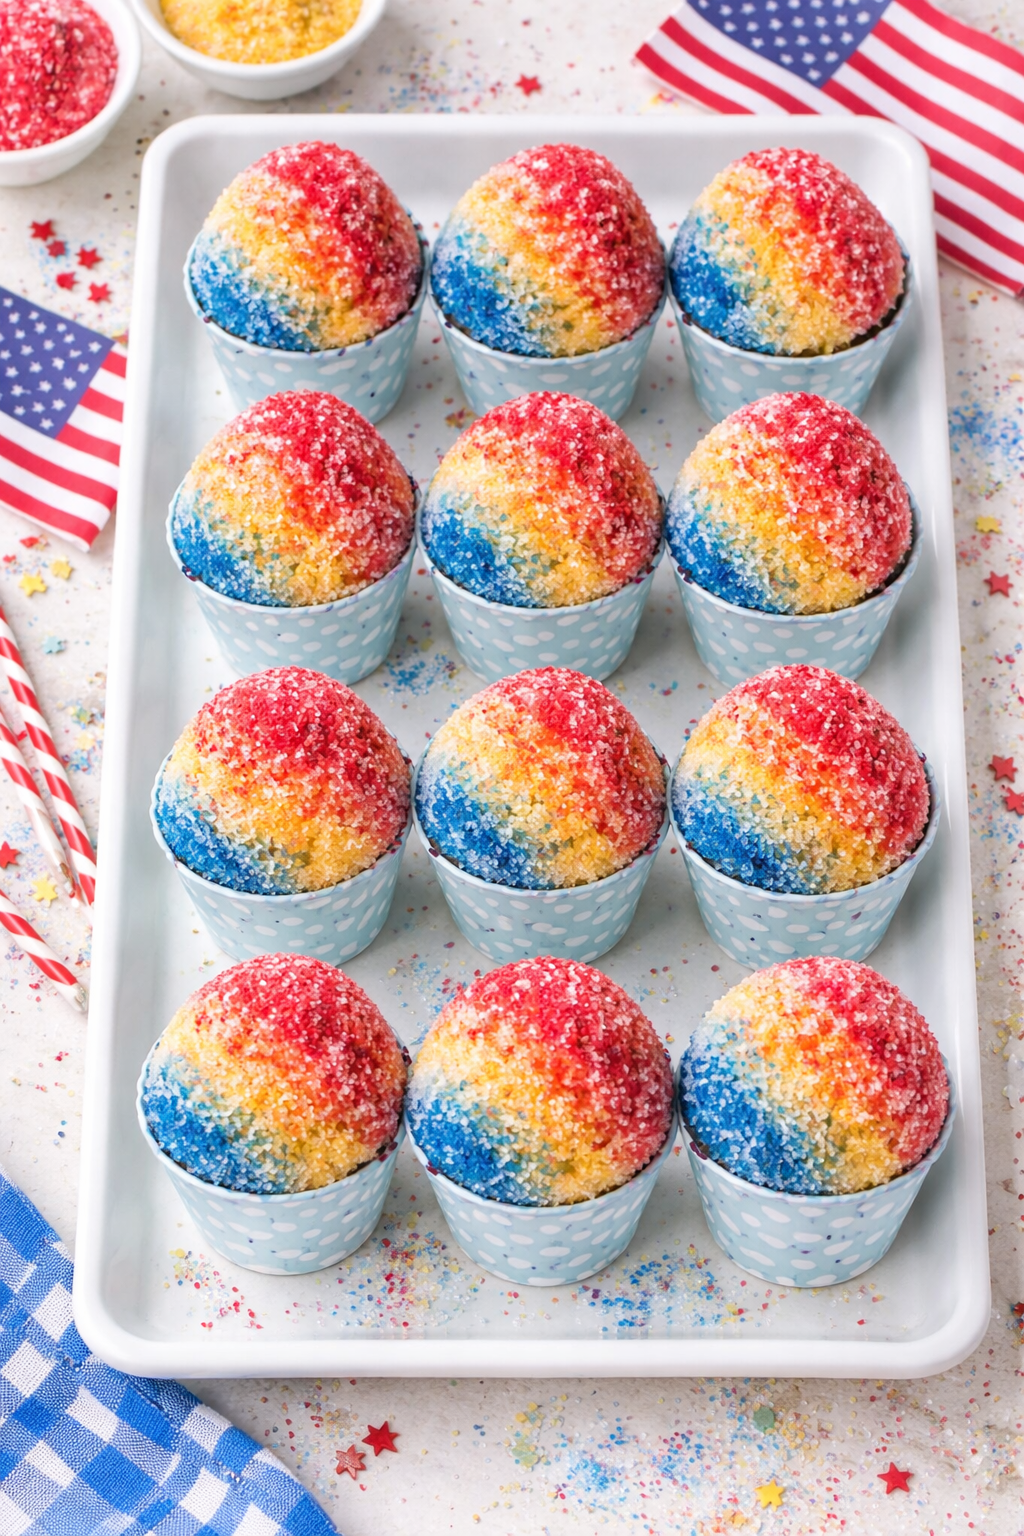
Pipe frosting onto the cooled cupcakes in a swirling motion to create a fluffy snow cone shape. The colors will blend naturally, giving that classic shaved-ice appearance.
Step 5: Add the Finishing Touches
Top with sanding sugar or coconut flakes for added texture. Serve immediately or store until ready to enjoy.
Tips for Perfect Snow Cone Cupcakes
- Use gel food coloring for bold color without thinning the frosting
- Chill cupcakes briefly after frosting to help them set
- Clear liners enhance the snow cone illusion
- Stick to light, fruity flavors for an authentic snow cone taste
Make-Ahead & Storage Tips
Bake cupcakes up to one day ahead and store unfrosted at room temperature. Once frosted, store in an airtight container in the refrigerator for up to 3 days. Bring to room temperature before serving for best texture.
Perfect Occasions for Snow Cone Cupcakes
- 4th of July celebrations
- Summer birthday parties
- Pool parties
- Carnival or fair-themed events
- End-of-school treats
These cupcakes are festive, eye-catching, and disappear fast at any summer gathering.

Snow Cone Cupcakes
- Total Time: 43 minutes
- Yield: 12 CUPCAKES 1x
Description
These snow cone cupcakes are a fun, colorful summer dessert inspired by classic snow cones. Soft vanilla cupcakes are topped with brightly colored sugar for a shaved-ice look that’s perfect for summer parties, 4th of July, and kid-friendly celebrations.
Ingredients
Cupcakes
-
1 box white or vanilla cake mix
-
Ingredients listed on the cake mix box (eggs, oil, water)
Snow Cone Topping
-
1 cup granulated sugar
-
Red gel food coloring
-
Blue gel food coloring
-
Yellow gel food coloring
Instructions
-
Preheat oven according to cake mix directions and line a muffin tin with cupcake liners.
-
Prepare the cake batter according to the package instructions.
-
Fill cupcake liners about ⅔ full and bake as directed.
-
Remove cupcakes from the oven and allow them to cool slightly.
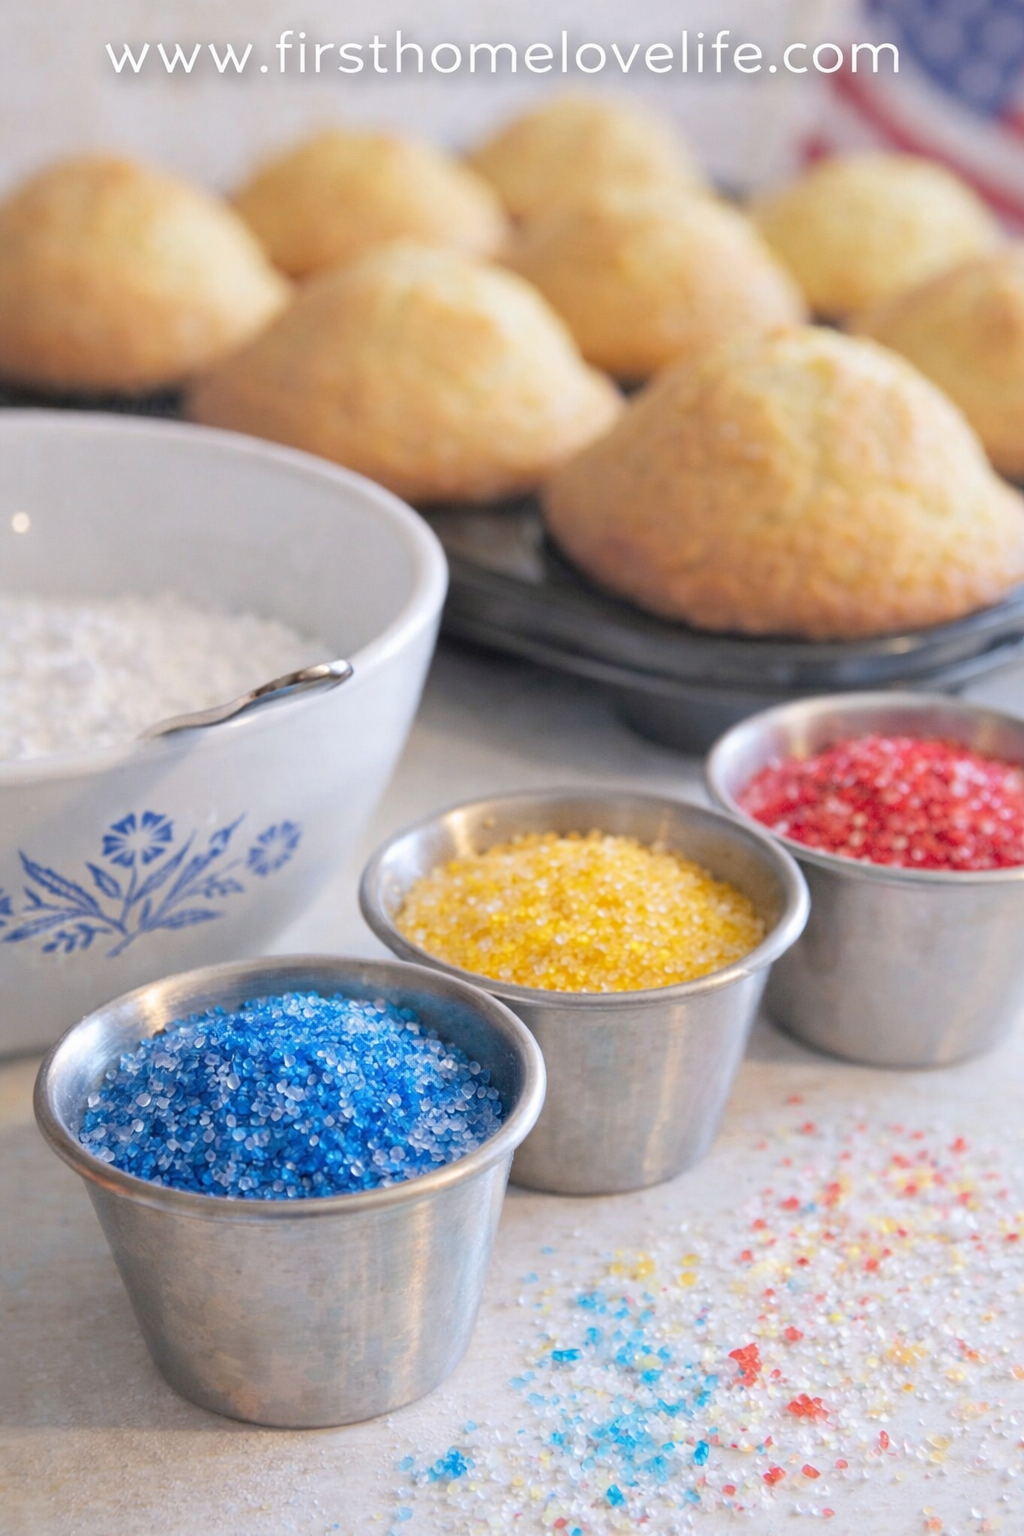
-
While cupcakes cool, divide granulated sugar into three small bowls.
-
Add a few drops of red food coloring to one bowl, blue to another, and yellow to the third. Stir until evenly colored.
-
While cupcakes are still warm, gently roll or sprinkle each cupcake with the colored sugar, layering colors to resemble a snow cone.
-
Allow cupcakes to cool completely before serving.
Notes
-
Gel food coloring works best for vibrant sugar without making it wet.
-
Apply sugar while cupcakes are warm so it sticks easily.
-
Clear cupcake liners enhance the snow cone look.
-
Store cupcakes in an airtight container at room temperature for up to 2 days.
- Prep Time: 25 MINS
- Cook Time: 18 MINS
- Category: DESSERT | CUPCAKES
- Method: Baking
- Cuisine: AMERICAN | SUMMER RECIPE
Frequently Asked Questions
Can I use homemade cake instead of a box cake mix?
Yes! Any white or vanilla cupcake recipe works perfectly.
Can I change the frosting colors?
Absolutely. Customize the sugar color and snow cone flavors to match your party theme.
Do I need a piping bag?
A piping bag gives the best look, but a zip-top bag with the corner cut off works too.
Final Thoughts
These snow cone cupcakes are everything a summer dessert should be — bright, fun, and incredibly easy to make. Whether you’re hosting a party or just celebrating warm weather, this recipe is sure to become a seasonal favorite.
If you make them, don’t forget to snap a photo — they’re almost too cute to eat!