• Home
  • About Me…
  • Advertising / Sponsorship
  • Disclosure and Privacy Policy
  • Pet Odor Be Gone EBook

First Home Love Life

DIY Blogs | Decorating Blogs | Crafting | Recipes

  • Organizing
    • Cleaning Tips and Tricks
    • Bathroom
    • Kids Spaces
    • Kitchen
    • Closet Organization
    • Office Organization
    • Garage
    • Home Maintenance Printables
    • Other Organization
  • DIY Projects and Home Decor
    • Kitchen
    • Bathroom
    • Dining Room
    • Entryway
    • Family Room
    • Guest Room
    • Office
    • Gardening
    • Pool Patio
    • Tutorials
  • Recipes
    • Appetizers
    • Beef/Pork
    • Breakfast/Brunch
    • Chicken
    • Holiday Favorites
    • Pasta & Pizza
    • Salads
    • Seafood and Shellfish
    • Side Dishes
    • Soups/Stews
    • Sweet Treats
  • Holidays
    • Valentines
    • St. Patricks Day
    • Easter
    • Fourth of July
    • Halloween
    • Thanksgiving
    • Christmas
  • Crafts
    • Spring Crafts
    • Summer Crafts
    • Fall Crafts
  • Pets
  • Other Topics
    • Orlando Fun
    • Party Planning and Ideas
    • Sponsored Posts

January 16, 2013 By Christine 7 Comments

Painting 101: Products and Prep Work

Painting-  While daunting to some people, is one of the quickest and least expensive ways to put your personal mark on a space in the interior of your home.

In this three part series I plan to show you the prep steps we take, products we use, and how we paint an interior room in our house…

If you remember, one of my 2013 home goals was to get started working on my daughters “big girl” room. Well…I’m happy to report that we have jumped right into this room makeover and it should be finished within the next few weeks!

In the meantime though, I thought it might be helpful for you to see what steps we usually take to get a room prepped and ready for painting. So here it goes…starting with supplies…

paintingproducts

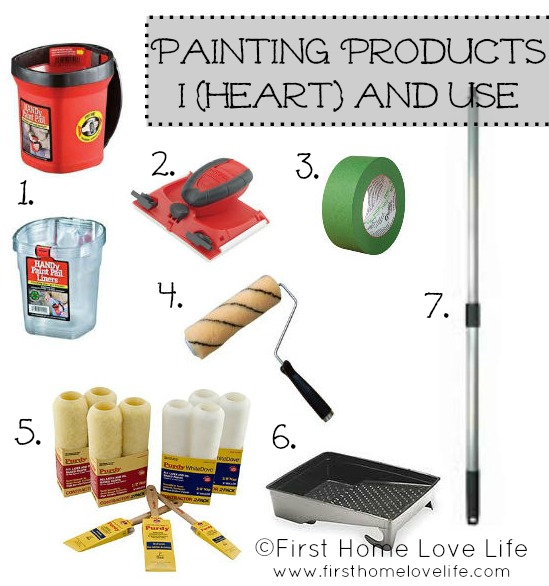
  1. The Handy Paint Pail and Liners have seriously changed my life. It has a magnet on the inside that holds your paint brush if you need to set it down quickly, and its soft rubber hand grip makes painting trim and molding comfortable and less clumsy! Clean up? A breeze! Seriously…no more messy paint cups, just pull the liner out when you’re done and toss it in the trash. ALL DONE!
  2. Shurline Trim Edgers are another product that I totally stand behind! I don’t have the steadiest hand for edging, but with this product and it’s easy to use disposable cloth sheets, painting trim and edges is a quick and painless experience!
  3. Painters tape- You have to prep your rooms if you want to paint like a pro! Lately I’ve been using FROGTAPE and totally loving it’s smooth application and removal.
  4. A roller…I’ve found that it’s not so much the roller brand as the roller itself. I just make sure it rotates smoothly and I’m good to go!
  5. Purdy products- Yep, I know…They’re kind of pricey, but the quality is just like no other in my experience. I make sure I clean them well in between uses and they  last quite a long time, so it justifies the price in my opinion.
  6. Paint pan and liners. Again, no name brand here, but a good, solid, heavy duty plastic or metal pan with replaceable liners will get the job done easily and with minimal clean up to follow!
  7. Paint roller poll is another must have… This adjustable roller pole not only helps me get hard to reach wall surface with my roller, but I can also screw my Shurline Edger onto it as well!
  8. Some other MISC. items (not pictured) that I always need for prepping to paint are drop cloths (or old blankets) spackling paste or nail hole filler, caulk, and a sanding block or sandpaper.
You may also like  Build a Window Seat

paintsamples

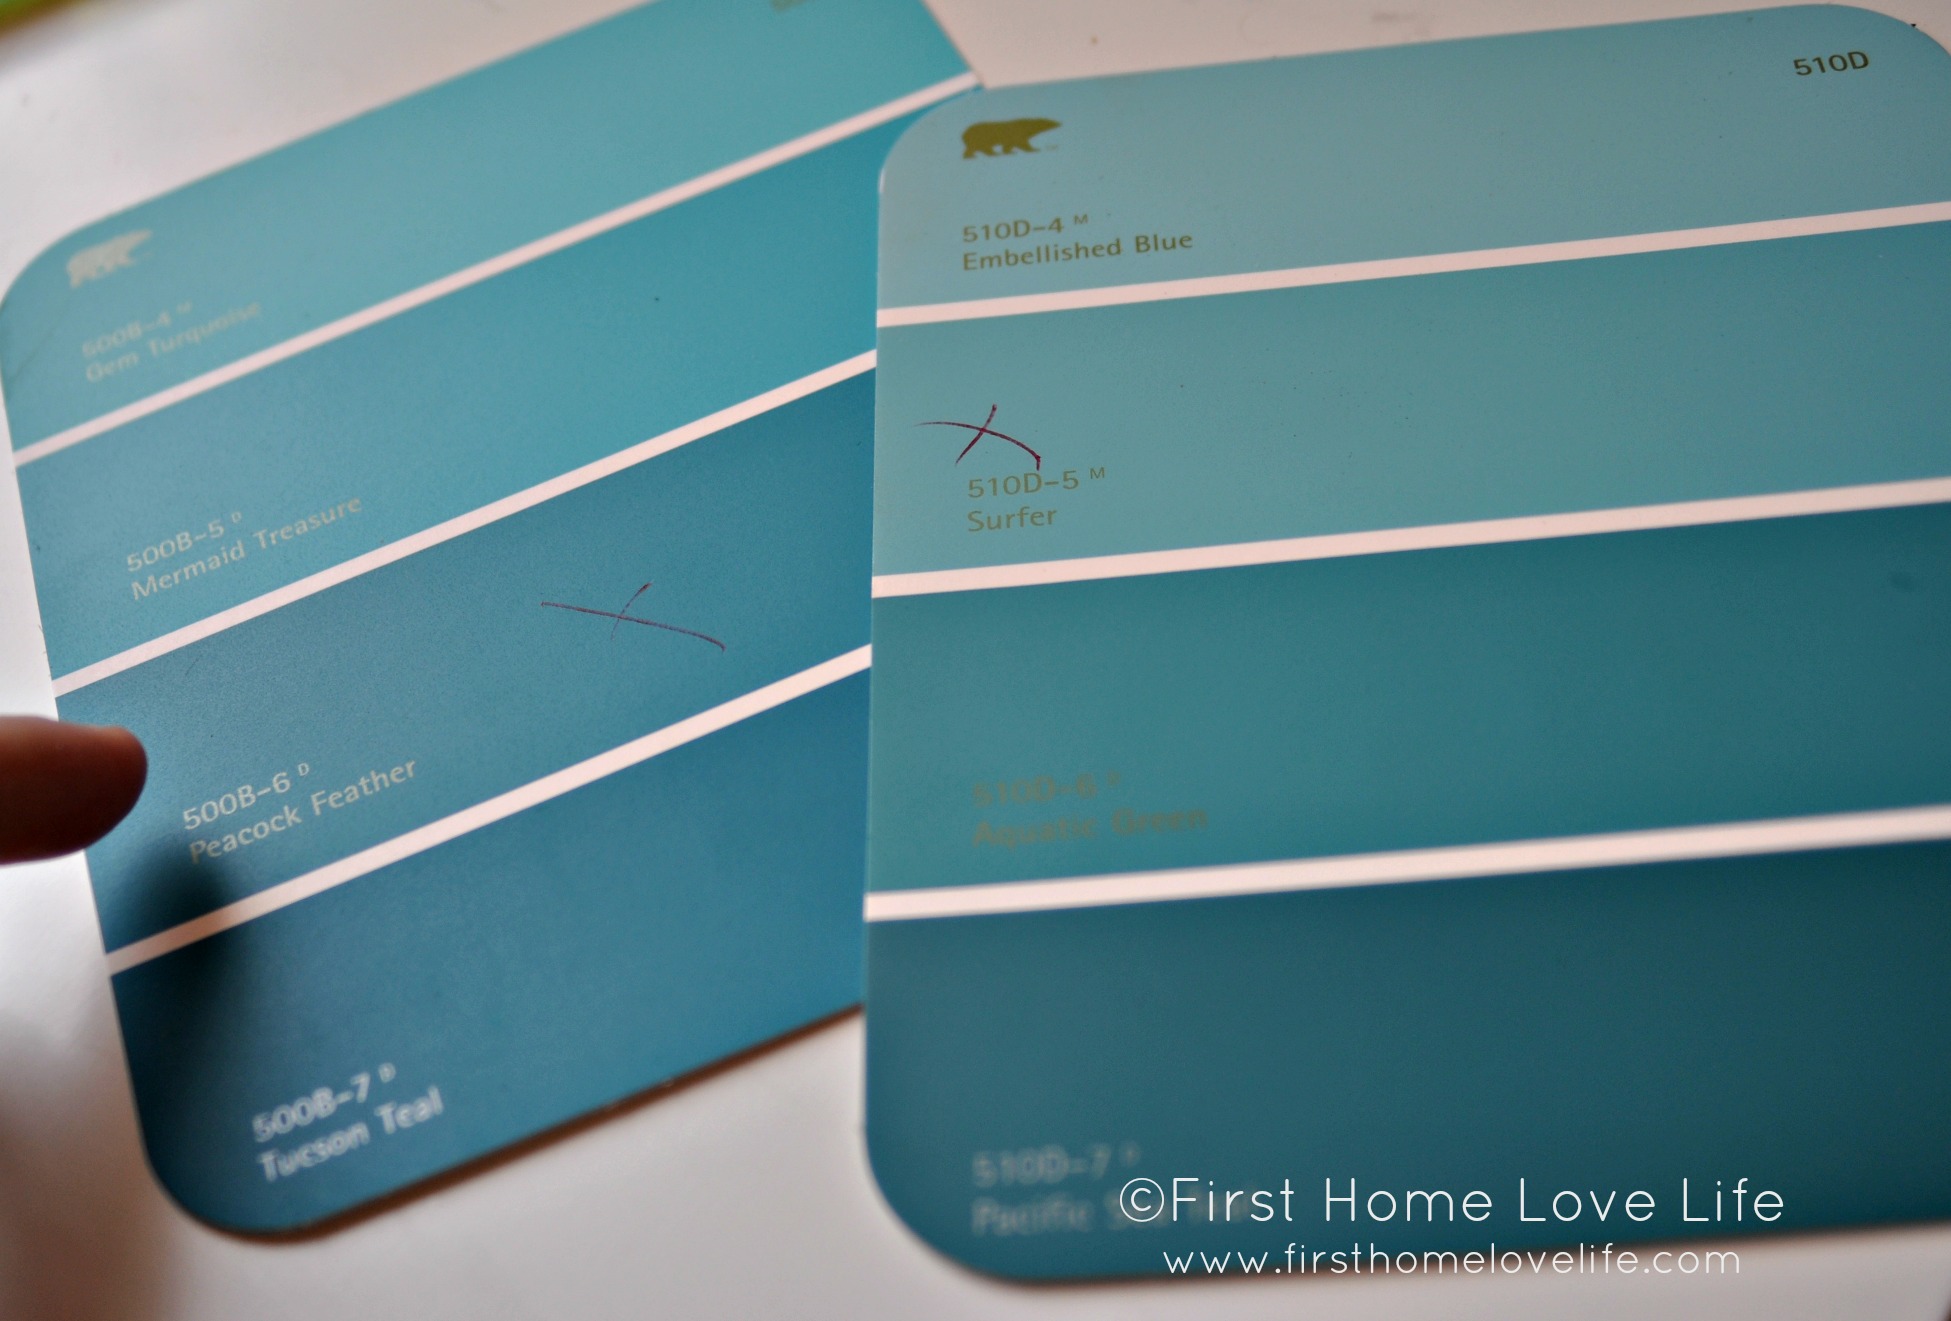
Picking out paint is completely preferential. The only advice I can give you is to go with your gut and test out samples (3 at most) if you have to. Any more then 3 is bound to confuse you and make your decision so much harder. These were the swatches I had picked out at Home Depot for my daughters room. I narrowed it down to two colors and had samples made up to take home and try.

samplepaintwall

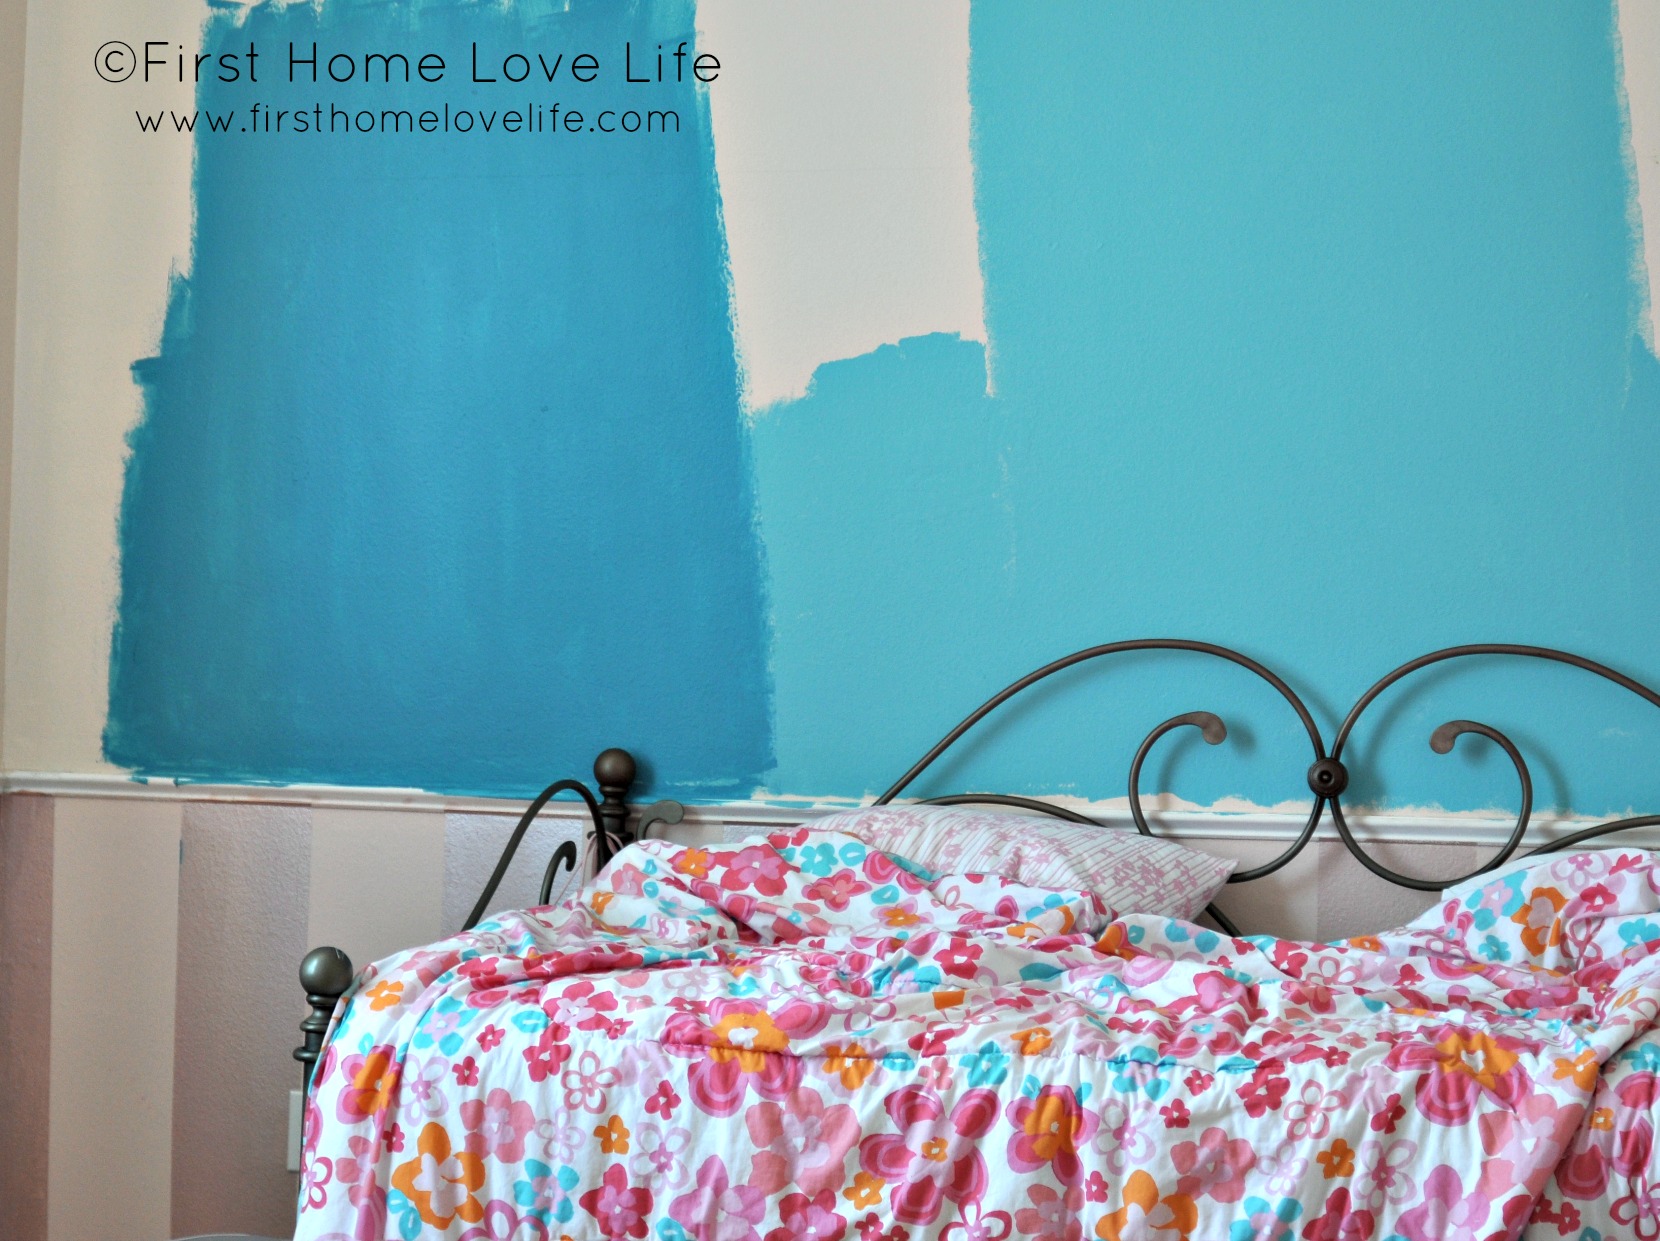
When I brought the samples home I immediately put them up on the wall. At first I was leaning more towards the lighter color, but as the day progressed and I saw it in different lighting I realized the darker color choice was the way to go. So I definitely recommend leaving your color sample up for at least 12 hours to look at it in every light.

You may also like  How to Clean Gunk Off Faucets

Now here you see, we are going from a light paint to a dark paint,so primer is not necessary, but if you are going from a dark to a light color then it’s always best to prime your entire room first, then you can start painting samples on the wall so you can see the true color.

readytoclean

Once we knew the color and how much we needed it was time to start prepping.

THE MOST IMPORTANT STEP…

MRSMEYERS

You have to clean your walls, baseboards, trim, and molding guys! It’s shocking to me that so many people skip over this step! If you’re going as far to pay for new paint and supplies, you might as well make sure it has a nice clean surface to adhere to; am I right?

You may also like  A Little Girl's "Big Girl" Bedroom

Most of the time I just use a damp cloth with warm soapy water, but because this was my daughters room and she had some paint, lipgloss, and god knows what else on her walls I brought in reinforcements.

SANDING

After everything was clean and dry I filled in all the nail holes and sanded any imperfections on the walls until everything was smooth, and then went over the area again with my wet cloth to get the sanding dust off the wall.

I also checked out her baseboards and chair rail to see if there were any gaps or cracks (there wasn’t) but if there was I would have re-caulked….

You can find part two of this painting series ‘Painting 101 -Paint Finishes and Trim’ here.

Disclaimer: I am not getting paid to endorse any of the products listed above. I just simply love them, and thought you would too!


Comments

comments

Filed Under: DIY PROJECTS & DECOR, Tutorials Tagged With: how to, painting101

Subscribe

Get the latest delicious goodness straight to your inbox!

« Make Your Own Lavender Soap
Painting 101: Paint Finishes and Trim »

Comments

  1. Inspire Me Heather says

    April 22, 2013 at 1:42 PM

    Great post – thanks and I’ve got this linked to my DIY painting advice roundup post too today!
    Inspire Me Heather recently posted…project: paintingMy Profile

    Reply
    • Christine says

      April 22, 2013 at 5:14 PM

      Oh fun! Thanks so much, heading over to check it out now 🙂

      Reply

Trackbacks

  1. PAINT, HOW TO, PAINTING 101, TUTORIAL, DIY, INFORMATION, PAINTING, BEDROOM, RENOVATION says:
    January 18, 2013 at 5:50 PM

    […] Here is part two of the Painting 101 series I’m doing as we begin to work on our daughters room makeover. You can find part one here. […]

    Reply
  2. Painting 101: Perfectly Painted Walls says:
    January 20, 2013 at 1:02 AM

    […] like I said in part one of this painting series, I don’t have the steadiest of hands, and neither does my husband for […]

    Reply
  3. The ‘Wrong’ yet Okay Way to Stencil a Wall says:
    January 29, 2013 at 1:26 AM

    […] last checked in on my daughter’s room progress we were in the midst of painting, you can find part 1, part 2 and part 3 here. I also gave you a glimpse at what was to […]

    Reply
  4. Get it Ready, Get it Done, Get it Clean (CLOSED) says:
    March 7, 2013 at 5:33 AM

    […] spare you the details of painting trim since I just did a three part series here, here, and here on everything you need to know about […]

    Reply
  5. Kids Closet Organization and Bedroom Progress - First Home Love Life says:
    October 7, 2013 at 11:52 PM

    […] We gave the whole room a fresh coat of paint. […]

    Reply

Leave a Reply to PAINT, HOW TO, PAINTING 101, TUTORIAL, DIY, INFORMATION, PAINTING, BEDROOM, RENOVATION Cancel reply

Your email address will not be published. Required fields are marked *

CommentLuv badgeShow more posts

This site uses Akismet to reduce spam. Learn how your comment data is processed.


  • Bloglovin
  • Facebook
  • Instagram
  • Linkedin
  • Pinterest
  • Twitter
  • YouTube

Oh, hi there!

Hi! I'm Chrissi! I'm a homebody and get excited about finding ways to turn my house into a home. I love being able to share whatever inspires me too. Whether it's an easy DIY project, cleaning tip or delicious recipe...you can definitely find something to try here! This is my happy place to share what's going on in my life...Oh, and maybe talk a little bit about the love for my furkids too! I hope you'll stick around... Read More…

Searching For Something?

Must Reads

Creamy Rigatoni with Ground Sausage and Fennel

Creamy Rigatoni with Ground Sausage and Fennel

Tarragon Tuna Pasta Salad

Tarragon Tuna Pasta Salad

Dijon Chicken Pasta with Sun Dried Tomatoes and Spinach

Dijon Chicken Pasta with Sun Dried Tomatoes and Spinach

Italian Style Pot Roast

Italian Style Pot Roast

Stuffed Eggplant Parmesan Boats

Stuffed Eggplant Parmesan Boats

Popular Pins

Creamy Tuscan Chicken Noodle Soup

Creamy Tuscan Chicken Noodle Soup

Shrimp Potato & Corn Chowder

Shrimp Potato & Corn Chowder

Bacon Cheeseburger Soup

Bacon Cheeseburger Soup

Smoked Salmon & Potato Chowder

Smoked Salmon & Potato Chowder

Brunswick Stew

Brunswick Stew

Popular Categories

 photo PETS_SIDEBAR_zps14497f7b.jpg  photo CLEANING_SIDEBAR_zps34a990b1.jpg  photo RECIPES_SIDEBAR_zpsf133a63d.jpg  photo ORGANIZE_SIDEBAR_zps252e5513.jpg  photo HOME_SIDEBAR_zps66e10eeb.jpg  photo ACCIDENTS_SIDEBAR_zps83bf730a.jpg

More Good Reads…

White Cheddar Broccoli Soup

White Cheddar Broccoli Soup

How to: Clean An Oven Easily

How to: Clean An Oven Easily

Let’s Organize…Our Finances!

Let’s Organize…Our Finances!

Real Life Pantry Organization

Real Life Pantry Organization

House Party #2 {B.Y.O.P} + Features!

House Party #2 {B.Y.O.P} + Features!

Latest From Instagram

Please DO NOT take material from this site without my written permission. My images and copy are licensed under a creative commons attribution license ©2011-2016 by Christine at First Home Love Life, LLC. If photos are taken and used on another site, a crediting link back to www.firsthomelovelife.com is required. I do allow pinning to Pinterest as long as a crediting link back is in place and copy from this site is not pasted into the description boxes.
**This site contains advertising banners and occasional affiliate links. In the event that an affiliate link is used, I receive commission on the sale of the products. The affiliate program does not sway my decision of what products to use and share as I only feature items I would link to with or without an affiliate link. All reviews and opinions on this site are mine and mine alone. I always give full disclosure at the end of each post if I'm paid or gifted to write about a product. I love to share my personal experiences and what "works for me", however, I cannot guarantee that those same projects, recipes, tips etc... will also work for you. As the reader, you assume any risks involved when completing anything seen on this site. I am not personally liable for anything that is completed based on the ideas and inspiration shared here.

You might also like

Stuffed Eggplant Parmesan Boats

Stuffed Eggplant Parmesan Boats

Chicken in Roasted Red Pepper Sauce

Chicken in Roasted Red Pepper Sauce

Homemade Doggie Cupcakes *Pup-Cakes*

Homemade Doggie Cupcakes *Pup-Cakes*

Homemade BBQ Sauce

Homemade BBQ Sauce

Rigatoni Sausage Bake

Rigatoni Sausage Bake

Copyright © 2019 · Divine theme by Restored 316

Copyright © 2019 First Home Love Life · Blogger to WordPress Migration by Linauer Designs · Log in